Sep 17, 2019

Finally Fall!

Featuring Bountiful Wreath from The Greetery
I hate to see the leaves start to fall but when the crisp air arrives, I welcome that!   I wanted to make a card using new fall products to get in that frame of mind!  I ordered the die from The Greetery and forgot to order the stamp!!  I realized it while I was at a crop, ordered it on Friday and it was in my warm little hands on Monday!!!  Great turnaround when you're in the mood to create! 

I started with The Greetery's Bountiful Wreath stamp and die.  It comes in a wonderful package.  I didn't figure out how wonderful until I was finished but lesson learned.  I used some of Gina K's inks.  The stamps are SO EASY and labeled for seamless layering!  I used an old Jennifer McGuire trick when doing the word dies ... I cut it, placed it back in the negative and THEN stamped it!  Perfectly lined up! 


Here's the finished product ... put it on a peice of kraft paper, popped it up and put the sentiment inside the wreath.


So ... for the lesson I learned I learned a little late for this one but will use for the next one ...the stamp set came with a clear plastic template to use when using a stamp positioner.  Line the stamp up with the image on the acetate and  you will get the perfect layer every time.  It also came with a color copy of each individual layer and where they can be layered.  This definitely cuts down on layered perfection anxiety!


I hope you make a fall memory today!


Aug 25, 2019


I’ve been making my way thru the Level 1  classes of Altenew’s Academy.  Today’s class was Easy Die Cutting Techniques.   I’ve found myself using my little Cuttlenug more and more so this class was definitely a help!  I used the Golden Garden stamp set and simply stamped the leaf bunch three times.  I die cut them. Sometimes it’s difficult when thin stems are involved but these were so easy and turned out great!   


I used some pattern paper from Kaisercraft’s succulent collection.   I smooshed some ink on a cube and flicked it on some white paper.  I don’t use the flick often enough.  It’s a great way to add coordinating color and fill some white space.


 After diecutting the bottom edge to create a little interest, I tied the three bunches together with a scrap piece of twine and added some enamel dots.


Thanks for checking me out!  I hope you make a memory today!

Aug 15, 2019

Calling all unused backgrounds ... there's still hope!


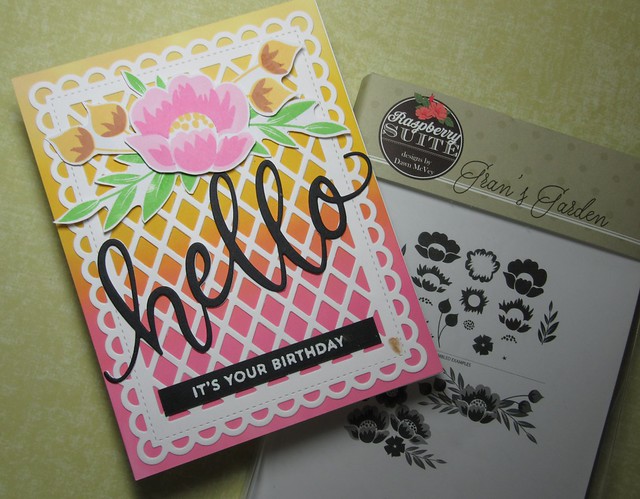
I'm still perfecting my card-making work flow.  Sometimes I make a background and it sits, and sits, and sits, until it is called to duty and I find a good use for it.  That's what happened with this background.  I actually made it about 3 months ago in a class and filed it away.  I have been practicing my layering techniques so I pulled out Paper Trey Ink's Grans Garden set.  I love this set!  I used some Altenew inks and wahlah!  A card is born!


I TOTALLY did not see the little boogie in the lower right corner until after I took the pic.  Blame it on the chocolate!  I used my sand eraser and it's good as new!  The background is blended with Tim's Distress Oxides of course. 


I hope you make a memory today!

Aug 14, 2019


All About Layering

The Altenew All About Layering class was full of useful tips and tricks.  I used what I learned in the class to create these sweet, clean and simple cards using the indoor garden stamp set.  Some were just two layers and other were three.  I used a few nontraditional colors to keep it fun!


I hope you make a memory today!


Aug 10, 2019


What's on my desk today ...


I got this Taylored Expressions set on sale a few weeks ago and finally got around to using it ... although I could probably say that about most of my stamps!!  They all will have their day, that's my plan!  I love the scene sets that have multiple seasons and multiple reasons.  So much fun to mix and match.  I'm not ready to say goodbye to summer yet but, it's been a weird one but I am looking forward to the change into fall.

Because Taylored Expressions uses the red rubber for their stamps, scenes like these could be hard to line up.  I used my Misti tool and stamped the flower image on a piece of clear plastic film first and lined it up that way.  Seemed to work well this time!  I colored the image with colored pencils.


Shopping List:


A Bushel & A Peck


I hope you make a memory today!

Aug 2, 2019

Altenew Layering Class


I created this card for the Altenew Academy Layering class.  I love using the layering technique!  I am still perfecting it but this Roses stamp made it easy!  Using Altenew's coordinating ink colors are made for this technique! I used a stencil to create the blended background. 


I hope you make a memory today!

Jul 31, 2019


Oh my I have been away from the blogging world for so long!  Can't believe I started this so long ago!  So much has happened since then - personally, professionally and with technology!  I didn't delete any past posts, although some are pretty sketchy, because it's fun to look back and see how far we've come!  It's all part of the process!
I resurrected this blog because I am participating in classes and challenges that require blog posting.  It is definitely outside of my comfort zone but that's what forward progress is!  By posting and sharing, I'm hoping to connect with the world wide crafting web on a level that inspires creativity and a little patience as I learn and grow.  
Memories Made Here is the name of the retreats I organize where scrappers and crafters get together to record old memories and make new ones ... oh the stories we could tell!  The almost-instant gratification of card making has become my passion lately but who knows what will show up on this blog! 


I hope you make a memory today!